Call Journey Home Inspections for all of your North Texas Home Inspection needs 817-296-8443!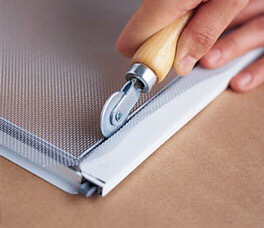
As Home Inspectors we see a lot of damaged and torn window screens. It’s a very common problem. Here’s a great article about how to fix those sceeens yourself!!
What you need: A flathead screwdriver, scissors, a utility knife, mesh-screening material ($3 for a small roll), spline ($4), and a spline rolling tool ($3.50; all available at lowes.com).
Step 1. Remove the screen (on its frame) from the window. It usually pops out, or it may be held in by clips. Place it on a flat surface and use a screwdriver to pry off the spline―the strip of rubber or plastic that holds the screening in the frame.
Step 2. Align the new mesh on top of the frame, keeping the grid straight. With scissors, cut the replacement screen to the size of the outer edge of the frame. Cut a small square from each corner (about the width of the frame) to prevent the material from bunching where the edges meet.
Step 3. Starting in one corner and working your way up one side, push the screen into the channel with the convex (pointy) end of the spline rolling tool. The goal is to achieve a slight indentation; no need to jam it in.
Step 4. Before moving on to another side, insert the spline. Use the concave end of the spline rolling tool to push the cord into the channel over the top of the screen; hold the screen as you go so it doesn’t bunch. Repeat steps 3 and 4 for the remaining sides.
Step 5. Push the spline into the corners with a screwdriver. Cut the spline overhang with scissors. Use a utility knife to trim the excess screen around the frame.